Tuesday, January 31, 2012

Peanut Butter Cookie Tuesday

My son and I decided to make peanut butter cookies today.  Okay, I decided and he decided to help :)  We only had one egg left in the fridge and some crunchy peanut butter that needed to be used up.  This is another one of those recipes that was passed down from my mom but she told me that she got it from the Better Homes and Gardens Cookbook :)  The only part that isn't written down is that my mom suggests crunchy peanut butter for a more peanutty taste.  It is up to you though so feel free to try it both ways or with whatever you have in the house which is usually how they get made here :)

I creamed the butter and peanut butter together.  Then I added 1/2 c flour and the rest of the ingredients to the bowl.
Then I mixed up everything and scraped down the sides.  I covered it with plastic wrap to store in the fridge to wait for it to firm up a little bit.


I prepared the sugar bowl and got out my cookie sheets while the dough was cooling.  Okay, I got to watch the Wiggles and Thomas the train too :)  Then my son gave me a few seconds to myself so I raced back into the kitchen to make the cookies.  First I used my cookie scoop to make the cookies a uniform size.  Then I rolled them in the sugar.


Then I put them on the cookie sheet with enough room for them to spread.


Then I smooshed them with a fork....

Then I did the whole tray with the crisis cross.  After the first batch, I always lecture myself that I press them too hard.  One of these days, I will just write that warning into my recipe but I end up with flatter cookies the first time around.

Then the final product comes out 7 to 9 minutes later and as my son said, it is the best cookie he ever had (that is his new saying for everything).  Don't take his word for it, make it youself.  If you would prefer to try mine, you better come over fast because both my son and I have already had two each.  I only got 21 cookies out of the batch because I made them so big but it is suposed to make 36 cookies if you make them per the recipe.  Here are some cookies to hold you over until you make yours :)

Peanut Butter Cookies

1/2 c butter
1/2 c peanut butter
1 1/4 c flour
1/2 c sugar
1/2 c brown sugar
1 egg
1/2 tsp baking soda
1/2 tsp baking powder
1/2 tsp vanilla

In a mixing bowl, beat butter and peanut butter with an electric mixer on medium to high speed for 30 seconds.  Add 1/2 c flour, sugars, egg, baking soda, baking powder, and vanilla.  Beat until combined.  Beat in remaining flour.  If necessary, cover and chill until dough is easy to handle.

Shape into 1 inch balls.  Roll in sugar  Place 2 inches apart on ungresed cookie sheet.  Flatten by crisscorssing with fork tines.

Bake at 375 degrees for 7 to 9 minutes.

Monday, January 30, 2012

Happy End of the Month

Make sure you print any printable coupons because the end of the month is the magical time when they all go away and new ones come up with the new month.  It would be sad to miss it just because the calendar flipped to the next month.

I hope that you had a great month and stayed on track with any budgetting and meal planning goals.  Do you want the good news or the bad news?  Only kidding, I think that it was good news all the way around for me.  The monthly budget came in just a little over but included $89 of boneless chicken and $30 of medicine for the sick boys at my house.  I don't usually count medicine but you cut down on the out of pocket costs, I used CVS gift card, ECBs and coupons.  It is hard to figure out how much was out of pocket because then I ended up paying for other things that I could have used the money for like diapers.  I did really great with the meal planning for the month and I am starting to work on next months plan to see what food we are going to need at the store in the coming months to refill the pantry and freezer.  It really helps at the end of a tough day to know that the food is waiting in the fridge so that you aren't sitting there wondering what you are going to eat.  It makes it much less stressful with a sick young one around and an exhusted mom (that's me) who would rather go to sleep then eat (still really wish that diet would work but it never does).  If you still aren't doing a meal plan, I highly recommend it.  It helps when you are in the grocery store to not pick up things that you don't need and it helps make sure you do have the things you can't make the dinner without :)  No more last minute trips to the store because you are missing one ingredient and coming back with $40 of groceries because you were starving or delaying dinner.  We are now eating every night around 6 pm instead of when I was working and trying to figure out what was for dinner and we were lucky to eat at 7:30 pm.... or when we were childless which was more like 8:30 pm.  I hope that your month went the way you wanted and you got done everything you wanted.  Looking forward to February!!

Menu Plan Monday 1/30/12

Monday- Crunchy Taco Rice
Tuesday- SW Speidies Chicken with white rice
Wednesday- Zesty Herb with Herb Rice
Thursday- Bisquick Chicken with pata roni
Friday- Pizza Roll
Saturday- Fried Rice with egg rolls/Shake N Bake with mac and cheese
Sunday- ????  Leftovers/Paninis ?????  Still waiting for a plan

Even though we moved around things last week, we ate basically what was on the meal plan for the week so I am hoping to do the same this week.  Last week I forgot to take out chicken one night so we moved the Friday night meal up and everything else around to meet the chicken defrosting schedule :)  That reminds me that I should get out the chicken for tomorrow sometime today.  Hope that your meal planning is going well and I will share recipe ideas throughout the week because I was trying to make another list of new things to try in the coming weeks.... maybe even Sunday :)  Have a great week!!

Sunday, January 29, 2012

Sunday Trip to CVS

Sunday morning seemed to come as a surprise to me.  I went to CVS without a plan to try to get a few things that were on my list with different deals for this week.  I only had $1 ECB to my name and not a clue on how I was going to start.  I didn't have any coupons cut or any plans written down.  That is nothing like my normal weekend but I have had a sick family for two months and I caught the sickness after fighting it off forever so I was lucky to be upright.

There was a Buy $30 P&G products and get $10 ECBs and Buy $15 of John Freida and get $5 ECBs which I couldn't miss.  I did the first transaction with three Pampers diapers and one Pampers wipes and after coupons it was $26.  I got my $10 ECB back which paid for the second transaction of  one John Frieda color foam, one John Frieda Conditioner, 2 bags of M&Ms, a loaf of bread, newspaper, and 2 boxes of Puffs tissues.  The total was $1.53 with tax after all my great coupons including a free hair color.  The great thing is that I also got $6 to spend next week (or whenever the sales are good again).  Hope that you found some good deals at the stores this weekend too :)

Trip to Giant for lunchmeat

I went to Giant this morning to check to see if they had any local papers left with coupons because my husband went earlier in the week and didn't find any.  I decided to look to see if they had any lunchmeat since my husband said that he would really like a ham and cheese sandwich on Monday. 

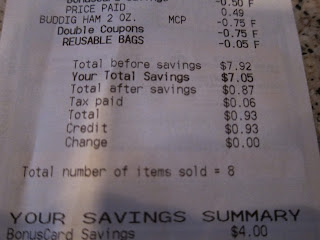
I was going to pick up 4 pacakages since I had a coupon for $0.75/4.  The Buddig ham was on sale for $0.49 instead of the new price of $0.99 so I went for it and got 8 packages.  After the $0.05 bag credit and two coupons, the total was $0.93.  The cashier said that it was a good deal and I was amazed on how well it worked out!  I wished that I had a few more of those coupons but I used them all up :(  It might be a great sale even without the coupons but check out the receipt below... I saved $7.05!!!

American Sandwich Bread from America's Test Kitchen made again

I made my second loaf of America's Test Kitchen bread and it was as good as the first.  The outside is nice and soft and doesn't flake the way the other white bread does.  I love some good bread and butter so I ate some hot out of the bread maker before I made panini sandwiches for the rest of the house.  It is super yummy and chewy so I highly recommend trying it.  If you come over, I will share a slice :)

Sausage Breakfast Sandwich

Saturday morning is usually yummy breakfast morning but I was feeling a little under the weather but I decided to make a simple breakfast just for my husband.  My mother got my husband a circle egg maker for Christmas (on my suggestion) in order to make healthier not McMuffins :)  I got a great deal on sausage patties at Harris Teeter awhile back and came up with this idea.  Normally I make biscuits but I asked my husband if he wanted it on bread and he said that he would love some of the yummy herb bread.  We only had the heal but I put some butter on it and put it on a griddle with the sausage patty and the egg.  I put it all together and made this sandwich which my husband said was really yummy.  Then he decided that he really wanted a second one so he had the heal of the American Sandwich bread.  Since the bread container was no really empty, I started on my next job... another loaf of bread.  I hope you all try a super simple at home breakfast sandwich that puts the fast food chains to shame :)

Friday, January 27, 2012

Leftover Chocolate Chip Cookies


You probably already learned from the chicken tenders that I like to use what is around the house to make things.  I only had a little bit left in a bag of chocolate chips so I decided to pull out what was around and make some cookies.  I found a little bit left of a bag of heath so I used those too.  Hence the leftovers, I have seen people use trail mix with nuts, cranberries and choc and other items that seem yummy outside of cookies like choc covered pretzels.  Feel free to mix and match what you have at your house.


I followed the secret family recipe from my grandmother, Nestle Tollhousen (okay, if you didn't watch Friends, that probably wasn't as funny but it gets laughs from my husband everytime).  We use the slightly modified recipe from the back of the Nestle package or their website which is actually where I originally got it :)  http://www.verybestbaking.com/recipes/18476/Original-NESTLÉ®-TOLL-HOUSE®-Chocolate-Chip-Cookies/detail.aspx.  My husband spent a long time changing recipes to find the recipe he liked because he likes a cakier cookie.  If you don't, decrease the flour 1/4.  Other options to make the recipe cakier include changing the baking soda for baking powder but I felt that they dried out sooner.  Mix up a batch yourself and try some fun ingredients that you have at your house.


Bryan's Chocolate Chip Cookies (modified from Nestle Tollhouse)

2 1/2 c flour
1 tsp baking soda
2 sticks butter, softened
3/4 c sugar
3/4 c brown sugar
1 tsp vanilla
2 eggs
2 c choc chips (12 oz package)

Preheat oven to 375 degrees

Combine flour and baking soda in a small bowl.  Beat butter, sugar, brown sugar, and vanilla in mixer until creamy.  Add eggs, one at a time, beating well after each addition.  Gradually add the flour mixture.  Stir in choc chips.  Refrigerate to let the dough settle before moving to the next step.  If you are going to leave it overnight, make sure you cover with plastic wrap.

Drop by rounded tablespoon or cookie scoop onto ungreased baking sheets.  Bake for 9 to 11 minutes or until golden brown.  Cool on baking sheets for 2 minutes.  Remove to wire racks to cool.


Wednesday, January 25, 2012

Homemade Chicken Tenders (or nuggets)

I had on the menu to make leftover chicken tenders tonight so I put together all my leftover crumbs that I had been collecting.  If you don't know what they are, I highly recommend them to everyone to try.  First, whenever you have leftover cracker crumbs, chips or other crunchy things, put them in a bag and set them aside.  I used stale tortilla chips before and made super yummy tortilla chicken tenders with mexican rice.  Today's leftover crumbs were cheese its and sun chips. Other ideas include Captain Crunch cereal (done at Planet Hollywood- they are soooo yummy), Ritz cracker (for the nice buttery flavor), and Pringles (one recipe through Hungry Girl recommends BBQ pringles for a spicy kick).  I like to keep my scraps apart so that we have a few of one kind of tender and a few of another but for those of you who can have food touching on a plate and be okay with it, mix up all those crumbs and have at it!!!!  :)

I got everything out on the counter and put crumbs in one bowl and egg mixed with water in the other.  If you are going for a more low fat version, you can use egg beaters or fat free milk (just note that with milk, the crumbs don't always stick as well).

I mixed the crumbs with bread crumbs this time because I am trying to use up containers of bread crumbs so that I can use all the homemade ones that I haven't used in the freezer.  I like to dip in the small breadcrumbs first and then the egg mixture and then the breadcrumb mixture (breadcrumbs and cracker crumbs).   It is super easy and super fast to put them together. 

Then you have to cook the chicken tenders.  There are two ways to cook the chicken:

1. Pan Fry (which was the choice that I made tonight)- Put a little bit of oil in the pan and heat it up.  Put the chicken in and flip when the edges start get looked cooked.
2.  Oven Fry-  I used to do this a ton because it is more healthy cooking.  Get all the chicken ready, spray a pizza pan with holes (with a paper towel under it or you will have a messy counter), put the chicken on the pan, spray again and then put in the oven.  It will get nice and crispy.  If you don't have a pizza pan, you can use a regular pan but you have to flip the chicken tenders half way through the cooking.  It takes a little longer to cook the chicken through this way so make sure you leave time.

I had a tough day with a sick kid so I took the extravagant choice of pan frying but both turn out great :)  I put them on that same pizza pan in the oven with some tater tots to cook through/stay warm.  Dinner will be ready in no time.  Great to serve with a salad so that everyone can have their choice of how to eat it or separate with a dipping sauce. 


I hope that you make leftover chicken tenders sometime soon!!!  You are sure to not have leftovers :)

Banana Bread Baking Day

I bought bananas at Harris Teeter when they were on clearance ($0.64 for 6 bananas or $0.32 per loaf of bread) but they weren't really brown enough to make banana bread.  The first set of three bananas was ready a little while ago so I made the bread which we promptly ate all of and I forgot to take pictures.  I decided that the other three were ready and that I would make the other loaf of bread today so I will make sure to take lots of pictures :)  The recipe is from my mom so there are lot of implied directions that are often found in her recipes. 

Break for a great mom story- A neighbor had dinner at my parents house and said she really loved it and would love to get the recipe.  My mom took out a index card and proceeded to write the recipe for the neighbor while she was talking to my dad (any of you who have been stuck with that know that he .  She filled an 8 1/2 x 11 sheet of paper front and back with the recipe.  The neighbor asked if my mom wrote other recipes or what the difference was.  My mom showed her the card and it only had a list of ingredients with no directions.  These the type of recipes that I got when I moved out on my own.  I frequently had to look in cookbooks or call home for clarification. 

1.  Mix the sugar and oil together

2.  Put the eggs in the measuring cup that you just poured the oil out of (or anything else if you don't mind making more dishes) and beat them and pour them in the bowl.


3.  Mash the ripe bananas in the same measuring cup and pour in the bowl and mix.  I put a picture of the "ripe" bananas because that seems to be the most frequent question on a banana bread recipe.  The browner the banana, the tastier the bread.  If you do get brown bananas on a Wednesday with no time to cook, you can mash them up and throw them in the freezer for when you are ready (or if you only have one banana at a time) But make sure that you write on the bag or you may never take it out again because it looks like mush :)


4.  Add in sifted ingredients and mix.


5.  Add in vanilla and milk and mix.


6.  Pour in greased bread pans and put in the oven for 1 hour. 


This makes one really nice sized loaf or a little extra in the cheater loaf so that I can eat it hot out of the oven but still look like I made it for my husband without eating any... what willpower.  Okay, he knows about the cheater loaf because he is frequently eating it with me when we make a loaf for someone else :)  I hope that you find some clearance bananas or ones that sat on the counter too long and you make a loaf too.  It is super yummy so I hope that you like the recipe as much as my family does.

Banana Bread


1/2 c oil
1 c sugar
2 beaten eggs
2 c flour
3 tbsp milk
3 ripe bananas
1/2 tsp baking powder
1/2 tsp salt
1 tsp baking soda
1/2 tsp vanilla

Beat oil and sugar together.  Add eggs and banana pulp.  Beat well.  Add sifted ingredients  Add milk and vanilla.  Mix well and por into greased and floured loaf pan.  Bake in preheated 350 degree oven about 1 hour.

Smart Cookies-the book, not the actual cookie

I grabbed a few books at the library when I was there with my three year old so it was much more in passing then I normally do.  I grabbed two books that looked like I had read them before (yup, that is how much time I got in the aisle after spending two hours in the kids section with him).  This was one of the ones that I got and I think that it is really interesting.  The Smart Cookies' Guide to Making More Dough: How Five Young Women Got Smart, Formed a Money Group, and Took Control of Their Finances by The Smart Cookies and Jennifer Barrett was a quick starting book that got right to the point of not being in debt.  It was aimed at people just starting out and what to do before things get bad (or even after they do).  It seems like a great gift for someone going off to college or someone going out on their own.  The best thing that they do is tell you to make long term goals so when you want to get a coffee at Starbucks or go out to dinner with friends, you are giving up on a trip to Italy (just an example from the book).  It is nice to see a book that tells young people that they don't have to give up everything to have what they want. 

They wrote another book which I added to my list:  The Smart Cookies' Guide to Couples and Money: Earn More, Argue Less, Achieve the Life You Want . . . Together by Andrea Baxter, Angela Self, Katie Dunsworth and Robyn Gunn. 

WARNING:  This next part has less to do with the book and more to do from what I learned from it.  If you don't want my rant, please feel free to skip.

Since I don't drink coffee, go out to dinner with friends, go out to drinks with colleagues, eat lunch out everyday, and get mani/pedis.... I just wasn't sure that this book was for me.  I might be a few years too late to this book because I could have used it when I started out living in the big city and not being able to afford it.  It wasn't that long ago that I couldn't remember but long enough that I can't change it now (although there is a part in the book that you are supposed to tell your younger self something and that would be it).  After getting a raise to actually be able to afford living in the "big city,"  I do remember spending more money then I should have.  I wish I would have thought of the big picture and saved a little more because as they note in the book, I don't really remember any of things that I bought as being that great or memorable.  They pose the question, if your house was on fire and you had to grab something, would it be the pair of jeans that you just spent $200 on?  Okay, I never in my wildest dreams owned or even tried on a $200 pair of jeans because my frugal nature and lack of fashion sense has never thought that was important.  Regardless, it was really hard in the moment of spending to think of a future where I owned a house, was married, had a kid, and quit my job (chronological order).  I knew that this book wasn't aimed at me making it on my husbands salary since it was about woman's power and not letting a man control all your finances and not knowing what was going on.  I do think that everyone should understand their finances and where the money is going.  When my husband and I joined finances, he managed most of the money because he was used to doing it (and a little better at remembering to send in bills by the deadlines).  I told him that I needed to have some hand in it because I just felt like I could spend all the money when I don't see the bills that go with it on the other side.  The joy of the modern world and using a credit card to pay for everything means that money isn't real but just an imaginary concept moving electronically.  I remember a friend's son asking for something and she told him that they didn't have any money to buy it.... he told her to go to the ATM and get some.  It is sad that kids don't see money anymore and don't have a concept of money and when there is no more.  I hope that I can figure out a way to raise my son to understand that concept so that he doesn't start off and not know how to only spend the money coming in and not go into debt.  In addition, there was a chapter on what you want to do when you grow up which is something that I have been trying to figure out for a long time (many conversations with my cousin on this subject so I hope that she picks up a copy of this book).  Long story short, I would recommend this for everyone because I think that it teaches a few very valuable lessons and really had me thinking about a lot of big picture things.

One thought to leave you with is:  What is your perfect day?  This took me a little bit to come up with but once you have the picture in your head, it gives you an idea of what isn't important to get to your perfect day so that you don't purchase the things that don't fit in with your long term goals.  My perfect day had nothing to do with money so mine might not help with the long term saving goals.  I would be sleeping in without my three old morning wake up call, taking a long hot shower without interruptions, having hot homemade doughnuts for breakfast (someone else is making them in my plan but since that is unlikely, I would make them :) yum...  I will share the recipe when I make them again), reading my book, spend time with my son and husband (but they are both healthy in this plan), go get a massage (that is the part that takes the little bit of money- in my grand plan I was somewhere on vacation so I would be at one of those fancy spa places with the fluffy robes but most likely in the real world I would go to my massage lady because she is closer, cheaper and friendly), and probably end the day with a yummy dinner with my husband (we used to get this kit in the grocery store that had a steak and gorgonzola pasta which was super yummy but they don't carry it anymore so I am still on the hunt to make something that yummy).  Anyway, it is a busy day but I think that it sounds super fun!!

I hope that you figure out your perfect day and work towards it.  Happy dreaming :)

Tuesday, January 24, 2012

Italian Herb and other almost homemade breads

Fresh bread is the best even if it isn't homemade!!  This is an Italian Herb bread that I made this morning so that my friend Ann and I could have it with lunch today.  It was super yummy with a hint of rosemary.  I threw it in the bread machine this morning and when we got back from storytime at the library, we had the completed loaf of bread (and still warm).  As I said today, the bread machine is like a carb crock pot :)
As much as I would like to say that this is a homemade bread, it comes from a box.  It is Fleischmann's Simply Homemade No Knead Bread Mix.  They have Country White, Muli-Grain, Stoneground Wheat, and of course Italian Herb.  The only one that I have left is Stoneground Wheat :(  


I thought they were really great and the bonus is that they are really easy recipe for someone without a bread machine with stir, rise and bake instructions listed on the back of the box.  It doesn't involve a ton of kneading or other time consuming steps.  Make sure you check them out the next time you are at the grocery store.  They can be found on the baking aisle of most stores near the flour and other baking mixes with a price around $2.99.  I hope that if you want fresh bread, you check out a box for yourself :)

Oatmeal Cookie Monday

I decided that I would try to be "healthy" and make oatmeal raisin cookies instead of chocolate chip cookies which were really calling to me.  I added all of the liquid ingredients to the mixer and creamed them.  I am normally not patient enough for the shortening to cream but my son pulled me away to do something else while the mixer was doing all the work.  I came back to find a nice smooth mixture.  I added the dry ingredients including the oats.  I accidentally bought original oats the last time I was at the store so this is with the regular oats even though my mom's recipe calls for quick oats.  I am sure that I understand the difference except that these are whole and not broken up.  The cookies tasted fine so I guess I am not that worried.  can you tell that I used the wrong oats?

Then I replumped the raisins.  I usually skip the raisins but my son has been eating raisins lately so I thought that I try them to add a little more "health" factor to the cookies.  Gotta love the Internet, it said to microwave some water and stick the raisins in for 5 minutes so I did.


Then I started baking... testing one out of each batch just to make sure.  I really should have eaten a better breakfast but the cookies were super yummy.  Let me know if you want me to save you one :)
If you would like to make some for yourself, please follow my mom's secret family recipe listed below :)

Oatmeal Cookies

3/4 c vegetable shortening
1 c brown sugar
1/2 c sugar
1 egg
1/4 c water
1 tsp vanilla

Beat above ingredients until creamy.

3 c oats
1 c flour
1/2 tsp baking soda

Mix ingredients and add to creamy mixture.  Bake at 350 degrees for 12 to 15 minutes.

Hope you like them :)

Cookbooks that are worth the read!

I got two cookbooks for Christmas because they were on my Amazon wish list.  Gotta love making a list throughout the year and getting fun surprises during the holidays.  I got one of these books out of the library and wrote down a list of recipes that I would try from it.  I got to try two or three before I had to return the book so I decided that I should get that cookbook and the other one by the same author, Erin Chase (better known at $5 dinners)

The $5 Dinner Mom Cookbook: 200 Recipes for Quick, Delicious, and Nourishing Meals That Are Easy on the Budget and a Snap to Prepare by Erin Chase (Paperback) was a great read.   The first few chapters were about some budget saving ideas like couponing, meal planning, sale stockup shopping.  The great part is it gives you immediate steps to start saving money and then recipes that she uses to save money right after that.  She even states that you can start with one step and add another so that you feel most comfortable.  I am already doing most of the hints in the book but it would be a great starting guide on different ways to save money.
Next, I went through and made a list of all the recipes that I thought that I would make from the cookbook with our picky eaters.  There were a ton of great recipes starting with baked ziti and going to homemade salad dressing.  I think that they are great weeknight meal ideas that you can pull together and get on the table before everyone isn't starving.  I think that it would be a great book for people who don't think that they can cook because it takes away any guess work.  It gave me some good ideas on different ideas to try.  Erin focuses on making a balanced meal with protein, starch, and vegtable dishes which is a little confusing and different from other cookbooks.  This is hard because different veggies are cheapest at different times during the year so my meal plan would be based on what I already have on hand or what is cheapest.
I also got The $5 Dinner Mom Breakfast and Lunch Cookbook: 200 Recipes for Quick, Delicious, and Nourishing Meals That Are Easy on the Budget and a Snap to Prepare by Erin Chase.  This was a really good mix of recipes that were for meals that are always hard for me to get creative for- breakfast and lunch.  This is the one that I took out of the library so I already made lemon coconut bread, quick carmel popcorn and baked oatmeal.  I actually wasn't a huge fan of any of the recipes that I made from this book but they were all good enough and quick and easy.  I have a feeling that if I try ones that are really meals, that they will be good.  I am looking forward to spagetti sauce pita and baked potato soup.

I hope that you all check out these at least from your local library.  The beginning of the one book is the quickest start to saving money that I have seen with lots of helpful hints.  If anyone wants to borrow my copy, just let me know :)

Monday, January 23, 2012

Menu Plan Monday 1/23/12

Monday- Sloppy Joes with tater tots
Tuesday- Apple Poppyseed Marinated Chicken with frozen rice
Wednesday- Chicken Tenders with special breading
Thursday-BBQ spiedies with white rice
Friday- Stuffed Shells Bertolli Oven Bake
Saturday- Meatball Sliders/Leftovers
Sunday- Pizza Roll (saw on the Chew last week so I will share the recipe later)/Hamburger Helper Philly Cheesesteak

I have started planning for lunch and dinner on the weekends to make it a little easier and they are interchangable based on how much time we have available for both so I have listed them both.  Plans changed around a few times last week because of all the sickness in the house but things are getting back on track because everyone is on the mend.  I have also started reading a few new cookbooks to get some great new ideas to make for dinner.  I will try to introduce one item a week but I might get lazy and go back to the same old things.  I am sure if the dishes are good then the idea will catch on better :)  If you have any easy weeknight meals, please feel free to share so that I can try some other family's favorite.

Sunday, January 22, 2012

American Sandwich Bread from America's Test Kitchen

I love, love, love America's Test Kitchen so I love trying their recipes one at a time (as I can find them).  I have a long list on my recipes to try that they have made but one that was first on my list was American Sandwich Bread.   But as you can see from their recipe, this is not made in the bread machine.  I have gotten really lazy (or dependant on my bread machine) so I adapted for the bread machine seen below the original.  Sorry that I forgot to take a picture of the very large loaf of bread that came out but it was huge!!  Here is the stack of sliced bread.  It is really soft and flavorful bread and I highly recommend trying it.  I will try to remember to take a picture next time.  I hope that you try to make a loaf of bread because it is the best side dish with a big bowl of soup in this cold weather :)  I posted a picture of the whole loaf here in case you want to see how the whole thing turns out.


American Sandwich Bread
(Source: Baking Illustrated , pages 74-75)
Makes one 9-inch loaf
This recipe uses a standing electric mixer. You can hand-knead the dough, but we found it’s easy to add too much flour during this stage, resulting in a somewhat tougher loaf. To promote a crisp crust,we found it best to place a loaf pan filled with boiling water in the oven as the bread bakes.
3¾ cups (18¾ ounces) unbleached all-purpose flour, plus more for dusting the work surface
2 teaspoons salt
1 cup warm whole milk (about 110 degrees)
1/3 cup warm water (about 110 degrees)
2 tablespoons unsalted butter, melted
3 tablespoons honey
1 envelope (about 2¼ teaspoons) instant yeast
1. Adjust an oven rack to the lowest position and heat the oven to 200 degrees. Once the oven temperature reaches 200 degrees, maintain the heat for 10 minutes, then turn off the oven.
2. Mix 3½ cups of the flour and the salt in the bowl of a standing mixer fitted with the dough hook. Mix the milk, water, butter, honey, and yeast in a 4-cup liquid measuring cup. Turn the machine to low and slowly add the liquid. When the dough comes together, increase the speed to medium and mix until the dough is smooth and satiny, stopping the machine two or three times to scrape dough from hook, if necessary, about 10 minutes. (After 5 minutes of kneading, if the dough is still sticking to the sides of the bowl, add flour, 1 tablespoon at a time and up to ¼ cup total, until the dough is no longer sticky.) Turn the dough onto a lightly floured work surface; knead to form as mooth, round ball, about 15 seconds.
3. Place the dough in a very lightly oiled large bowl, rubbing the dough around the bowl to coat lightly. Coverthe bowl with plastic wrap and place in the warmed oven until the dough doubles in size, 40 to 50 minutes.
4. Gently press the dough into a rectangle 1 inch thick and no longer than 9 inches. WIth a long side facing you, roll the dough firmly into a cylinder, pressing with your fingers to make sure the dough sticks to itself. Turn the dough seam-side up and pinch it closed. Place the dough seam-side down in a greased 9 by 5-inch loaf pan and press it gently so it touches all four sides of the pan. Cover with plastic wrap; set aside in a warm spot until the dough almost doubles in size, 20 to 30 minutes.
5. Keep one oven rack at the lowest position and place the other at the middle position and heat the oven to 350 degrees. Place an empty baking pan on the bottom rack. Bring 2 cups of water to a boil in a small saucepan. Pour the boiling water into the empty pan on the bottom rack at set the loaf onto the middle rack. Bake until an instant-read thermometer inserted at an angle from the short end just above the pan rim into the center of the loaf read 195 degrees, 40 to 50 minutes. Remove the bread from the pan, transfer to a wire rack, and cool to room temperature. Slice and serve.


American Sandwich Bread (adapted for the Bread machine)

3 1/2 cups bread flour
1 cup warm milk (about 110 degrees)
1/3 cup warm water (about 110 degrees)
2 tablespoons unsalted butter or margarine
3 tablespoons honey
2 teaspoons salt
1 envelope (about 2¼ teaspoons) instant yeast

Put milk, water, and butter to microwave safe bowl and microwave for 1 minute to warm depending on microwave strength.  Pour into bread machine pan.  Add 3 tbsp honey to pan.  Add 3 1/2 cups bread flour.  Put bread machine yeast and salt on top.  Put on light setting and 2 lb. loaf and start the bread machine.

Cinnamon Roll Pancakes

I found a recipe awhile ago for Cinnamon Roll Pancakes which I really wanted to make during the holidays but decided that it was too much work when there were more people to feed.  I looked at some choices for special breakfast treats today so I decided to try this one since I had everything already in the pantry.  It was a little slow going for me but I think that I finally got it by the third and fourth batch.  Check out the swirl (ignore the other pancake mess in the lower corner of the picture).


The final product wasn't as neat as the one on recipegirl.com (please check out her great post here)  but after the many batches I think that my finished product wasn't bad.


We didn't use the cream cheese icing because my husband isn't a fan.  Of course, he pointed out that I had some in the freezer so I could pull it out for just mine.  I made a cream cheese glaze for cupcakes which I then froze and have used for the cinnamon rolls at Christmas.  I highly recommend keeping something really easy like that in the freezer so that if you decide to make this on a weekend, you just have to pull out the icing and the filling from the freezer the night before.  It would make it much easier to put together a quick morning treat.  I hope that you decide to try them too!!!  If you don't want the cinnamon roll part, the pancake batter is nice and fluffy so feel free to try just the pancakes too :)  Also, when I made them, I got way more then 4 pancakes so I didn't make them nearly as big as the recipe called for.


Cinnamon Roll Pancakes


Ingredients:


PANCAKES:
1 cup all-purpose flour
2 teaspoons baking powder
1/2 teaspoon salt
1 cup milk
1 Tablespoon canola oil
1 large egg, lightly beaten

CINNAMON FILLING:
1/2 cup butter, melted
3/4 cup brown sugar, packed
1 Tablespoon ground cinnamon

CREAM CHEESE GLAZE:
4 Tablespoons butter
2 ounces cream cheese
3/4 cup powdered sugar
1/2 teaspoon vanilla extract

Directions:

1. Prepare pancake batter: In a medium bowl, whisk together flour, baking powder and salt. Whisk in milk, oil and egg, just until batter is moistened (a few small lumps are fine).
2. In a medium bowl, mix butter, brown sugar and cinnamon. Scoop the filling into a small zip baggie and set aside. You don't want this to remain super-liquidy. It's best if it becomes a consistency similar to toothpaste.
3. In a medium, microwave-safe bowl- heat butter and cream cheese until melted. Whisk together until smooth; whisk in powdered sugar and vanilla extract; set aside.
4. Heat large skillet over medium-low heat. Spray with nonstick spray. Scoop about 3/4 cup batter onto the skillet. Snip the corner of your baggie of filling and squeeze a spiral of the filling onto the top of the pancake. When bubbles begin to appear on the surface, flip carefully with a thin spatula, and cook until browned on the underside, 1 to 2 minutes more. Transfer to a baking sheet or platter and keep in a warm oven until ready to serve.
5. When ready to serve, spoon warmed glaze onto the top of each pancake.


Tips:

*Keep the heat low or your pancakes might cook up too quickly. Don't flip them until you see those bubbles starting to pop on top. Flip them with a wide spatula so you can grasp the whole thing without batter and filling dripping all over the place!
*It's best if you pour the batter onto your skillet, wait a minute or so and then swirl the cinnamon onto the batter. That'll give it a chance to set a little before you add the swirl.
*If your baggie of filling begins to get too thick, just pop it in the microwave for a few seconds to soften it up again. On that same note, it shouldn't be too runny. The consistency of soft toothpaste is perfect. If it's melty and runny, it will tend to run all over your pancakes. Once you micro it, let it sit on the counter at room temp for a while until it thickens slightly.
Source: RecipeGirl.com

The Panini Process

How to make the perfect panini:

1.  Make a loaf of bread the night before.  I tried American Sandwich Bread (will post next) for the first time.

2.  Cut loaf of bread and take break to test bread (yummy plain but need to try some with butter too).


3. Unpack wonderful new Cuisinart Griddlers from best Aunt and Uncle for Christmas  (THANKS!)


4.  Put together the pieces of the new griddler and review directions and check out how cool it looks :)


5. Cut leftover buffalo chicken tenders which were made extra to make paninis.


6.  Butter bread for paninis.


7.  Take out shredded cheese and be really glad you did this before since you have already made a mess of the kitchen.


8.  Get everything plugged in to start preheating and put all the stuff around the griddle for easy access.


9.  Get paninis arranged on griddle and (be amazed that you can now make two instead of one like on the old panini maker) put cheese, meat and then cheese and top with other buttered bread.


10.  Wait 3-5 minutes and then you have yummy hot buffalo chicken paninis for lunch :)  The bread is bigger than the plate but it was super yummy still!!!


Wasn't that the 10 easiest steps to getting a yumy sandwich for lunch?  If you don't have the wonderful new Christmas gift that I do, you can use a plain pan, griddle or grill pan on the stove and wrap a brick in aluminum foil and put it on top.  It pushes the two sides together and makes it flat on both sides.  It is a very frugal panini press :)  Hope that you all enjoy!!!

Friday, January 20, 2012

Cheese Muffins for dinner

I decided that Friday would be cooking day.  We are having buffalo chicken for dinner with mac and cheese so I decided that cheese muffins would be a good recipe to try.  I am not great at trying new recipes and usually go back to the old reliable ones that I always use but this one sounded good when I read it in the America's Cheapest Family book so I thought I would try it.  I also went out to get honey the other day because I had a bread recipe that needed the honey so I figured that I had everything in the pantry.  I mixed up all the ingredients.

I added in the dry ingredients and started mixing.  It did end up a little lumpy but it looked good.  I added the cheese to the top of the muffins (please ignore the ugly pans but they are my favorite pans).


After 10 minutes, they were already popping up and looking really yummy.  I waited patiently for them to come out of the oven to try the final product.  We had them with dinner and I might recommend less cheese on the top because it was too crispy :)  I hope that you decide to try these too so here is the recipe.


Cheese Muffins

¾ c whole wheat flour
1 c all purpose flour
½ tsp salt
1 tbsp baking powder
¾ c grated cheddar cheese
2 eggs
¼ c oil
1 c milk
¼ c honey
Parmesan cheese to sprinkle on top

Preheat oven to 400 degrees.  Grease 12 muffin cups.  Don’t use paper liners for this recipe.  Stir together the whole wheat, all purpose flour, salt, baking powder and cheddar cheese in a large bowl.  In a separate bowl, combine eggs, oil, milk, and honey.  Stir together the liquid and dry ingredients.  The mixture will be lumpy but that’s okay.  Fill the prepared muffin cups ¾ full.  Sprinkle the parmesan cheese on top.  Bake 20 minutes or until golden brown.  Recipe can be doubled or tripled.  Makes 12 muffins.

Snickerdoodle cookies

My husband's favorite cookie is snickerdoodles which has been on my list forever to make.  Since today is bake something new, I decided that this would be a good choice. 

For many years, we had a friend that made them for him every holiday but they moved a little farther away so it was passed to me.  No- literally, she gave me the cookbook that she used. 
It looks like something from the 60's but it was actually reprinted during the 1980's but still all the classic recipes with the particular recipe earmarked.  I am almost positive that we had the same cookbook in home ec class in middle school because it looks the same as some photocopies that I have.

Over the holidays, I went to the store and got a little container of cream of tartar since I didn't have any in my cupboard (never have!!)  All the other stuff was in my pantry so I was ready to go whenever I had time to make the cookies. 
                                             
Fast foward to today and I am making the cookies.  The recipe was simple and easy so I am not sure why I put it off so long.  The final product was super yummy.  I made them much bigger then the recipe called for so I only got 30 cookies instead of 6 dozen.

Look how yummy that looks with the cracks all through showing the soft cookie.  I hope that my husband loves the good surprise and I hope that you try it too.

Snickerdoodle Cookies


1 1/2 c sugar
1/2 c margarine
1/2 c shortening
2 eggs
2 3/4 c all purpose flour
2 tsp cream of tartar
1 tsp baking soda
1/4 tsp salt
2 tbsp sugar
2 tsp cinnamon

Heat oven to 400 degrees.  Mix 1 1/2 cups sugar, margarine, shortening and eggs.  Stir in flour, cream of tartar, baking soda and salt.  Shape dough by rounded spoonfuls into balls.  Mix 2 tbsps sugar and 2 tsp cinnamon; roll balls in mixture to coat.  Place about 2 inches apart on ungreased cookie sheet.  Bake until set, 8 to 10 minutes.  Immediately remove from cookie sheet.  Makes 6 dozen (unless you make them as big as mine). 

Hope you enjoy the recipe :)

Shared on Spatulas on Parade Cookie Jar

Thursday, January 19, 2012

Applesauce Bread kind of morning

I made banana bread earlier in the week with the old bananas that I bought at Harris Teeter when they were on clearance that were finally bad.  I finished the heels of the bread this morning so I decided it was a good day to make some Applesauce bread.  I found a recipe awhile ago when searching for uses of all the applesauce that I bought when my son still liked applesauce.  Now that he greatly dislikes it, I figured that I would make cake, cookies and other baked goods to use it up.  I used up the first jar and went on to the second jar.  This is probably one of my favorites because it is super yummy, easy to make and feels healthy :)  Isn't applesauce healthy even if you mix it into bread???  I made it and had to test it first... okay I forgot to take a picture and it smelled so yummy that I got a piece and my son took a piece but doesn't it still look yummy???

If you want to try it for yourself, please feel free to test it out.  Let me know what you think :)

Applesauce Bread

1/3 cup butter or margarine, softened
1 cup sugar
1 egg
1 1/4 cups applesauce
1 1/2 cups flour
3/4 teaspoon baking soda
3/4 teaspoon ground cinnamon
1/2 teaspoon baking powder
1/2 teaspoon salt
1/2 teaspoon ground nutmeg
1/8 teaspoon ground cloves

In a mixing bowl, cream butter and sugar. Add the egg and applesauce and mix. Combine flour, baking soda, cinnamon, baking powder, salt, nutmeg and cloves. Add until combined. Pour into greased loaf pan. Bake at 350 degrees F for 60-65 minutes.

The batter looks nice and dark even before baking.  Don't worry if you see spots of butter because it will all bake into the bread even if it doesn't look as creamy as other batters.  The bread will get nice and cripsy along the edges which is my favorite part :)