The first step was to wash the seeds which I did in the bowl that I was using already because I was too lazy to clean the strainer for such a small project. I swished them around and got off a lot of the pumpkin gunk. It would have been much easier in the strainer because then I needed to use my hand to strain the water which was too much of a challenge so I ended up picking up the seeds in my hand and letting the water sift through my fingers.
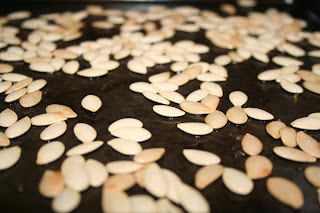
I put them on a cookie sheet to dry out. They will start to stick so don't put them on towels or paper towels to dry or they will get stuck. Every time I went through the kitchen, I gave them a swish around so that they didn't stick to the pan. I left them overnight because they were still not dry until then.
Do you see the water on the pan? Luckily, they were the pretty clean.
The next morning, I got out the olive oil and sea salt from the cupboard after piling all of the seeds into the middle of the cookie sheet. Making sure to preheat the oven to 250 degrees since I wanted to pop these in and get them in my lunch box.
I poured the olive oil in the middle of the seeds and moved them around with my hand while the oven was preheating.
They cooked at 250 degrees for a little less than one hour. I would have cooked them a little longer but that was all the time I had before I had to leave the house. I poured them right into my container and packed them in my lunch. They were a great little snack and the salty crunchy flavor was a really nice treat and way more healthy then eating a bag of chips. I did use a little too much salt because when I made them before, the salt didn't stick but they actually did this time so don't overdo the salt.
I hope that you make these the next time you have a pumpkin whether it is a jack o lantern or for pumpkin puree like I made. Make sure you dry the seeds completely because I really think that this is the key to the best final product. They were a tasty treat and I am super glad that I didn't throw them away like I have so many times in the past. Much more thrifty to use what you have and not have any waste.
I hope that you make the extra effort and try some for yourself soon!! My little container lasted me two days and they were a great addition to my lunch. If you want to make your own, check out the recipe below.
Pumpkin Seeds
Ingredients
- Pumpkin Seeds
- Olive Oil
- Sea Salt (or salt of your choice)
- Any Seasonings You Want (optional)
Instructions
As you clean out the pumpkin, keep all the seeds (and pulp) in a bowl. Trash any large chunks of pulp and whatever pumpkin you can clean out by hand. Put them into a colander and rinse them under cold water, pulling away the chunks of pulp as you go and trashing.
Spread the rinsed seeds out on a baking sheet to dry overnight. Don’t place them on paper towels or towel because they will get stuck when drying.
When they are dry, preheat the oven to 250 degrees. Drizzle the seeds with a couple teaspoons of olive oil.
Use your fingers to toss the seeds around to coat. Then salt and season the seeds to taste. Bake for an hour or until the seeds are light golden brown. Let them cool for a few minutes and eat. Store in an airtight container if they last beyond the first day.


No comments:
Post a Comment
Thank you for visiting my blog today! I really appreciate any input or ideas so add your comment below.