1. More frugal: You can make homemade items for pennies and save lots of money from prepared or boxed items at the store.
2. More healthy: I realize that making cookies and cake isn't "healthy" by the normal definition but it is much healthier to eat yummy goings without preservatives and extra ingredients that you can't pronounce so knowing what you are feeding your family.
3. I LOVE BAKING!!!! Homemade baked goods taste so much better and are more fun to make!!!
Many people don't cook from scratch because they don't have the time to do it. I understand that because it gets busy and many people don't have the time to mix up everything but I find that most of the work is dragging everything out of the cupboards and not just making the item.
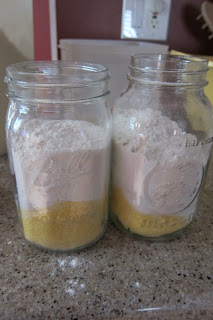
If I want to make cornbread, I usually take out a bowl and my two mason jars. Do you wonder why? I make one batch in the bowl to make now and the other two I mix the dry ingredients in the mason jar.
I make a really cool funnel out of paper because it is way easier to do with a funnel and I don't have one that hasn't been used on oil or stored in the basement so I am not taking any chances (plus the paper works pretty well and you can adjust the opening size). I look at the recipe and I see that I need to add 1 cup of corn meal so I add it to each jar and the bowl.
Then I look for all other dry ingredients and I add the 1/2 c sugar to all of the containers.
I added the 1 cup of flour for the last level of the pretty layers. Don't you like how the flour gets stuck in the top "funnel" but just shake it a little and it goes straight down.
I take out the "funnel" and add the salt and baking powder.
The great thing is that I have now spent the same amount of time and made one cornbread for dinner tonight and put two other ones in the cupboard so that I don't have to drag everything out again next time. This is perfect to plan for the weekends when you might have a little more time or before the dinner rush because there is no reason why you can't leave the bowl on the counter for a few hours until you are ready to put it in the oven.
Below is the recipe if you would like to make it for yourself. If you have a favorite recipe, feel free to fill it in place of this one. I look forward to stocking up on flour and making cookies and other recipes. If you don't have wonderful leftover mason jars, feel free to use ziploc bags. These are easy to keep in the cupboard or the freezer. The great thing is that they can be refilled over and over so that you always have things on hand to quickly throw together your favorite dishes!!
Even better to make them for gifts for friends to enjoy your great recipes!!! Here is the recipe on how to make it and you can attach it to a jar if you are giving it as a gift (with or without the dry ingredients listed so that they can make their own).
Cornbread
6 tbsp unsalted butter
1 c flour
1 c cornmeal
½ c sugar
4 tsp baking powder
1 tsp kosher salt
2 large eggs
1 c milk
- Preheat oven to 375 degrees. Put the butter in a 10 inch pie plate and place in the oven to melt.
- Mix the flour, cornmeal, sugar, baking powder, and salt in a large bowl. In a smaller bowl whisk together eggs and milk. When the butter has melted, take the pie plate out of the oven and swirl the butter around to coat the pan. Let it cool for 1 or 2 minutes, then pour the butter into the milk-egg mixture. Whisk to combine.
- Whisk liquid into dry mixture (not to much- lumps are okay).
- Pour into the pie plate and bake for 25 minutes. When it is done, the bread will be slightly puffed and a toothpick inserted in the middle will come out clean. Serve immediately. Leftovers keep for few days covered at room temperature.


No comments:
Post a Comment
Thank you for visiting my blog today! I really appreciate any input or ideas so add your comment below.